In this topic we'll talk about the basic workflow through the software. It is a good place to start if you are new to the software, and a good refresher if you are upgrading from an older version.
In version 8, the workflow is a little less linear than it was in version 7.x, and some restrictions are lifted in how we get to a final layout. But as a general rule, the workflow looks like this:
- Import and clean up artwork
- Auto Populate
- PowerFlow Editing
- Power Supply Loading
- Stats and Title Block
- Save/Export
We'll go through this workflow in some detail, with descriptions and links to other help topics where appropriate. In version 8, some of these steps in the workflow can be comnbined, and there is automation to reduce the amount of effort/time required to get through each step
Import and Clean Up Artwork
For the majority of jobs, you'll be starting with some customer artwork and importing it into the software. As covered in more detail in the Importing Files section, LED Wizard 8 imports a wide variety of both vector and bitmap formats from a variety of sign and graphic design software programs.
| Vector |
Bitmap |
| PDF |
JPG |
| AI |
PSD |
| EPS |
PNG |
| DXF |
TIFF |
| PLT |
PCX |
| EMF |
BMP |
Please note that even though there are many bitmap formats listed here, a vector file is nearly always better than a bitmap file. PDF is listed here as a vector file, but it can also be a bitmap file, or support both vector and bitmap elements in the same file.
In the Import dialog box, you can Crop in the preview window to only select the art that you want, a function we call Import Crop. You must have a vector file in order to use Import Crop.
When you import your artwork into a new layout, it will land in the Data Clean Up Tool for processing. This is a new tool n version 8 that combines several other tools into one interface, with the goal of getting your artwork ready for population.
Once you get through the Data Clean Up Tool, you'll be ready to enter PowerFlow and move to the next step.
Of course, an alternative to importing artwork is to create original art in the software using the Text Tool or perhaps one of the Shapes commands to make a cabinet. This is a great option if you can match the font on otherwise poor artwork and/or can create a basic shape such as a rectangle, square, circle, ellipse, rounded rectangle, or polygon.
Auto Populate
With your artwork scaled and cleaned up, the next step in the workflow is to enter PowerFlow and select the settings for Auto Population.
But before you do that, you should Group your artwork so that you are using a consistent LED module for that population. For example, if you have some small channel letters and a large cabinet, these would use different modules, and so you would select or group them separately prior to entering PowerFlow. The same logic would apply to a design with both large and small letters, or a design with different can depths.
To go into the PowerFlow operating mode, click on the PowerFlow button in the PowerFlow Tab in the upper right of the screen. When you do this, the PowerFlow Property Bar will appear across the top of the screen with its many options.
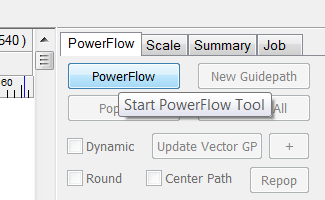
Now you can select your Brand of LEDs, the Series of module, the Color of the module, and the Depth of your sign, leading to the final list of available modules.

Based on your artwork, the parameters you've entered, and the density guidelines of the selected module, one more "guide paths" will be calculated inside of your artwork. If you are populating channel letters, this may result in one or two runs of LEDs. If you are populating a cabinet or cloud sign, you may want to switch to the Parallel Layout option to run the rows in parallel straight lines.
 LED Wizard 8 Documentation