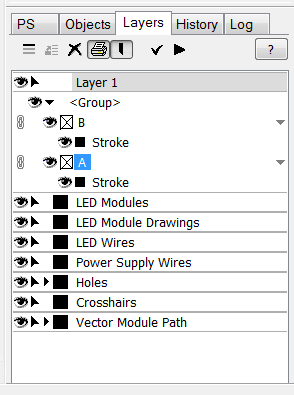
The Layers Tab shows all the layers in your layout in an easy to view, heirarchical tab. Layering allows objects to be controlled in the following ways:
- Shown or hidden from view
- Editable or not editable
- Printable or not printable and
- Plotable or not plotable.
All objects in a layout are automatically assigned to a Layer. By definition, all the items in a Layer have the same status with regard to the four possibilities indicated. Changes in each Layer can be made by clicking on any of the four icons shown below for view, print, edit and/or cut/plot.

 View Icon
If the View icon is grayed out, it means all items in the selected Layer are not visible and they cannot be selected or modified in any way.
 Print Icon
If the Print icon is grayed out, it means all items in the selected Layer cannot be printed.
 Edit Icon
If the Edit icon is grayed out, it means all items in the selected Layer are visible but they cannot be selected or modified in any way.
 Cut Icon
If the Cut icon is grayed out, it means all items in the selected Layer cannot be cut or plotted.
All the individual objects in each Layer are listed in the Layer dialog box. If the item is colored, it is displayed in its color. You can also adjust the Z Order in the Layers Tab, meaning which objects are on top of or below other objects. See Z Order Tools for more information.
Note that the various elements of a completed design are organized in layers. When the design is complete and ready to send to the production department, each Layer can be exported as a separate file depending on the production process in which the output data is to be used. Depending on the job and your workflow, these layers may include mounting holes, vector module path, channel letter return plots, and more. See Export for more information.
 LED Wizard 8 Documentation
 LED Wizard 8 Documentation